BIDS at MRC
MRC raw data
Research data collected at MRC should be pushed to the server FOU1 after each completed session. Doing so, and registering your session in the CIR-session Redcap form ensure your data is collected in your project folder on SPICE within 24 hours. The data is stored in the original DICOM format and organized according to a study specific subject ID, session number and MRI sequence number.
The pipeline described below focus on the standard CIR-protocol that includes a set of sequences commonly used in MRI research but the same approach can be used for any MRI data collected at MRC.
The raw data in your project on SPICE is read-only and will be structured like this:
/data/projects/yourproject/raw/mri/sub-XXX/ses-XX/
├── 00000001
|       ├ 0000001.dcm
|       ├ 0000002.dcm
|       ├ ....
|       └─0000180.dcm
├── 00000002
|       ├ 0000001.dcm
|       ├ 0000002.dcm
|       ├ ....
|       └─0001985.dcm
└── 00000003
        ├ 0000001.dcm
        ├ 0000002.dcm
        ├ ....
        └─0022500.dcm
CIR offer support in organizing your data as BIDS and provide an simplified interface for using the dcm2bids in parallel to effeciently organizing your data on SPICE. Essentially, dcm2bids look through your raw data, check if the DICOM metadata match the criteria you specify in a config file and if so, convert those DICOM files to Nifti and organize them in a BIDS format.
The dcm2bids config file is a JSON file that specify what criteria to look for in the DICOM metadata for each sequence in your protocol and how to name the output files. Building this config file can be a bit tricky, but CIR offer this helper that extract the relevant DICOM metadata from your data and present it in an interactive table in your browser so you can select what criteria to include in your config file.
See general steps (0 to 2) on: BIDS on SPICE
There are some common steps you should go through for making any imaging data to BIDS, see link above.
3. Analyze your data
Open the URL in your local browser. If this is your first time, you will see the window below. You are prompted to select one representative session from your data. This session will be analyzed with the dcm2bids_helper function.
This function go through the DICOM files in the selected session and export their unique DICOM meta data to a JSON file for each unique sequence. These are saved in the bids-utils-mr folder on SPICE under dcm2bids_helper/helper.
Note that localizer/scout sequences and calibration sequences generated by the camera are excluded. Susceptibility-weighted imaging (SWI) sequences are not yet defined in BIDS and are not included in the helper output. See BIDS Extension Proposal BEP-004 for progress on defining SWI in BIDS.
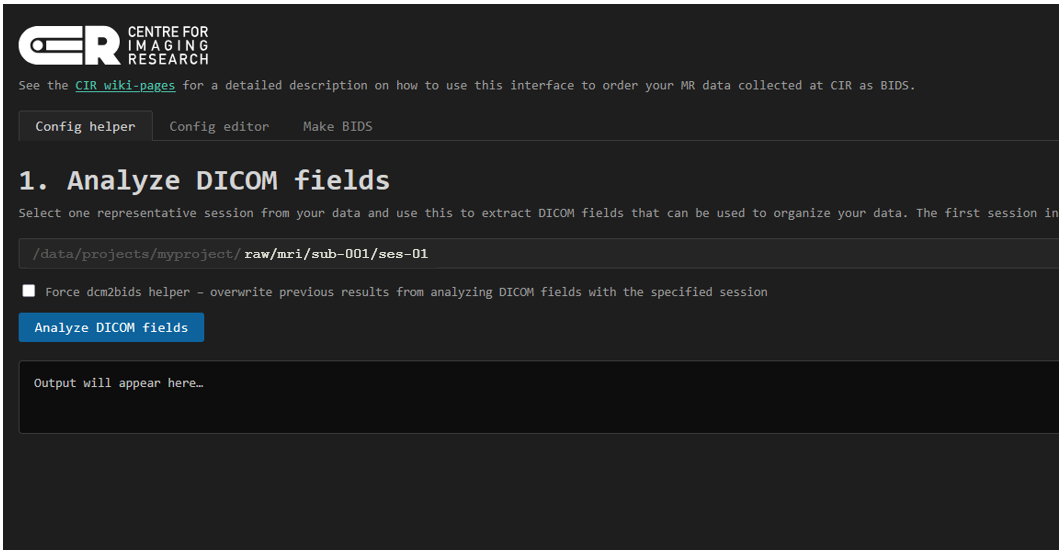
Clicking Analyze DICOM fields will start the analysis. Depending on how many and what sequences are in the selected session, this will take a couple of minutes to complete. The ouput from dcm2bids_helper is printed in the faux terminal window on the page. When the analysis is done, a summary of the most commonly used fields are printed in a table in the browser so that you can use these to build your config file for dcm2bids. These are:
Series number: The order the sequence was run in your protocol.Series description: The name of the sequence in your protocol.Pulse sequence name: The name of the sequence as it is saved in the DICOM metadata.Image type: A list of keywords describing the sequence, e.g.ORIGINAL,PRIMARY,PERFUSION
You can select and analyze different sessions for defining your config file, but easiest for you is to select a session that you know contain all the sequences you are interested in. Check the box Force dcm2bids_helper to overwrite the current JSON helper files with new ones.
4. Build config file
The input
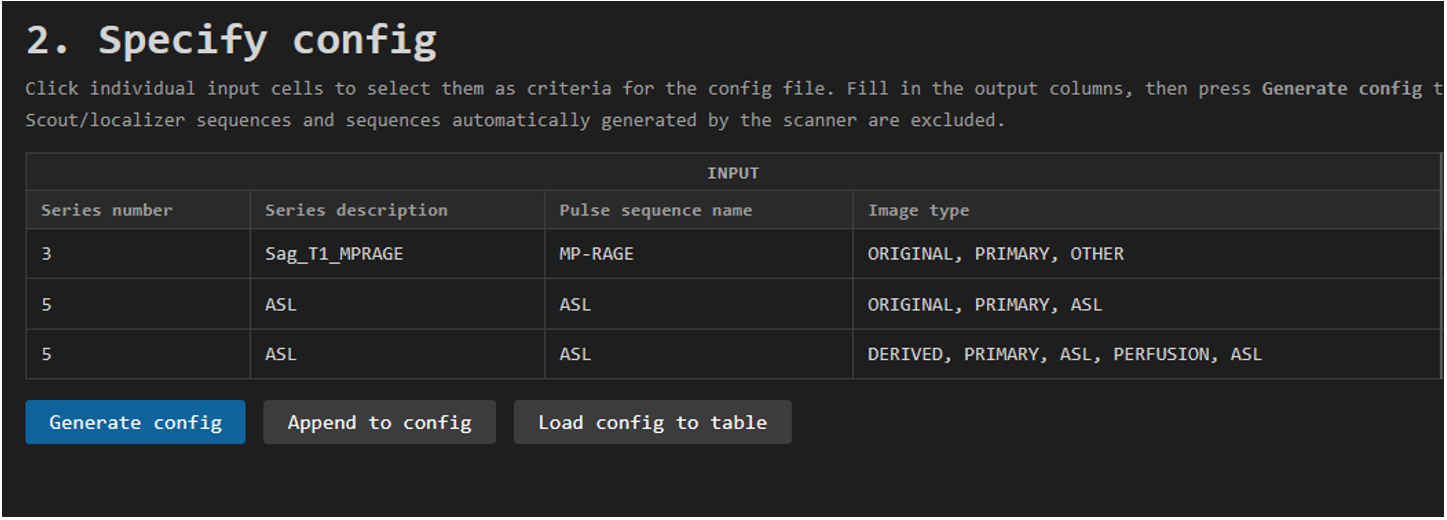
When dcm2bids_helper is done, the section 2. Specify config shows up. This section summarize the DICOM fields from the JSON files created by dcm2bids_helper (i.e. your representative session). Now, you can use what is in your data to construct a config file for dcm2bids so it knows what inputs to look for in your raw data and what outputs to genarate as BIDS. This is an important step that can require some detective work, esepecially if you skipped step 0, but you only need to do this once.
If you ran the helper before, this table will show the summary from the last session you analyzed. In the image below is an example of a session that has one structural T1 sequence and an Arterial Spin Labeling (ASL) sequence.
The left columns under INPUT are used to define the inputs for dcm2bids. That is, what do you want dcm2bids to look for in your data. Click on the fields in the table to select them to be included as a criteria for that sequence in the config file. You must select at least one field as a criteria in each sequence you want included.
If you want dcm2bids to skip a sequence, simply do not select any criteria for that sequence and it will be ignored, and not included in the BIDS output.
Note that the ASL sequence (Series number 5) is split in two entries. Some sequences are split and need to be BIDSified separately. In the case of this ASL sequence, we see in the column Image type that the first entry is the ORIGINAL m0 reference scan and the second entry the DERIVED perfusion-weighted ASL image.
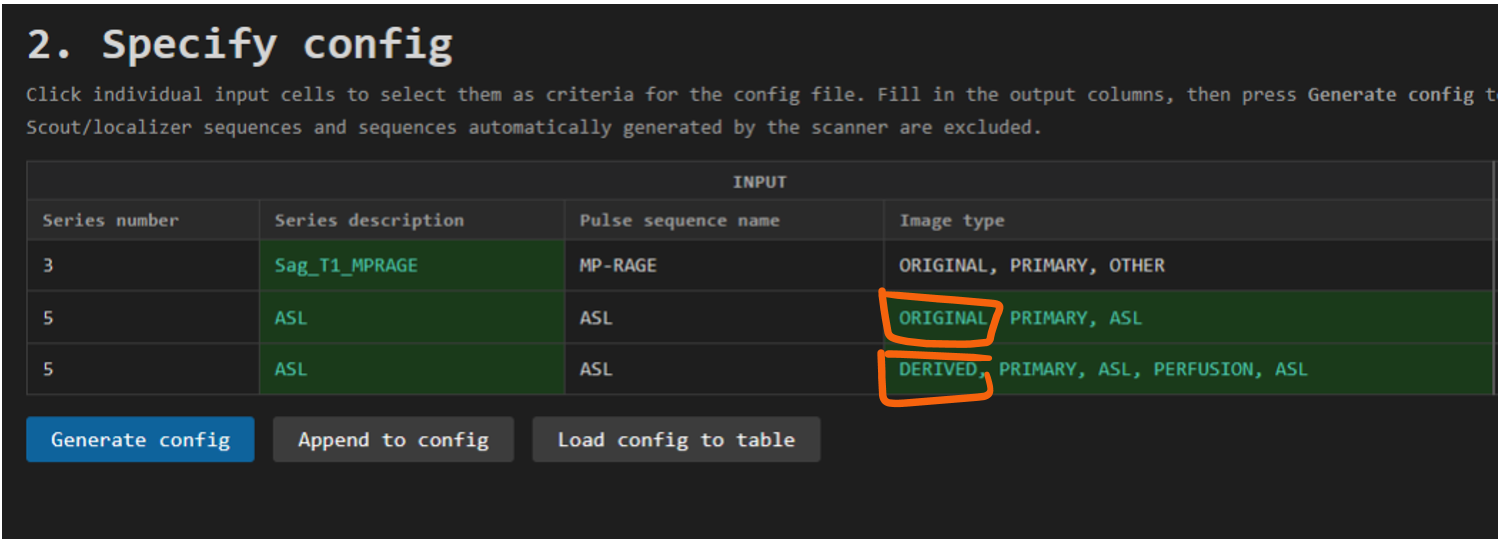
For the T1 it's enough to select its unique Series description as a criteria for identifying this as a unique sequence in the data. For the ASL sequence, the Image type must also be selected and included as a criteria to keep the ASL data and the m0 reference scan separate in the BIDS output. That is, the combination of criteria must be unique for each row of data that you want in the BIDS output. If not, dcm2bids will not know how to separate them and they will be merged in the BIDS output, or separated by the best guess dcm2bids can make, usually by includig a run-1 and run-2 tag.
The output
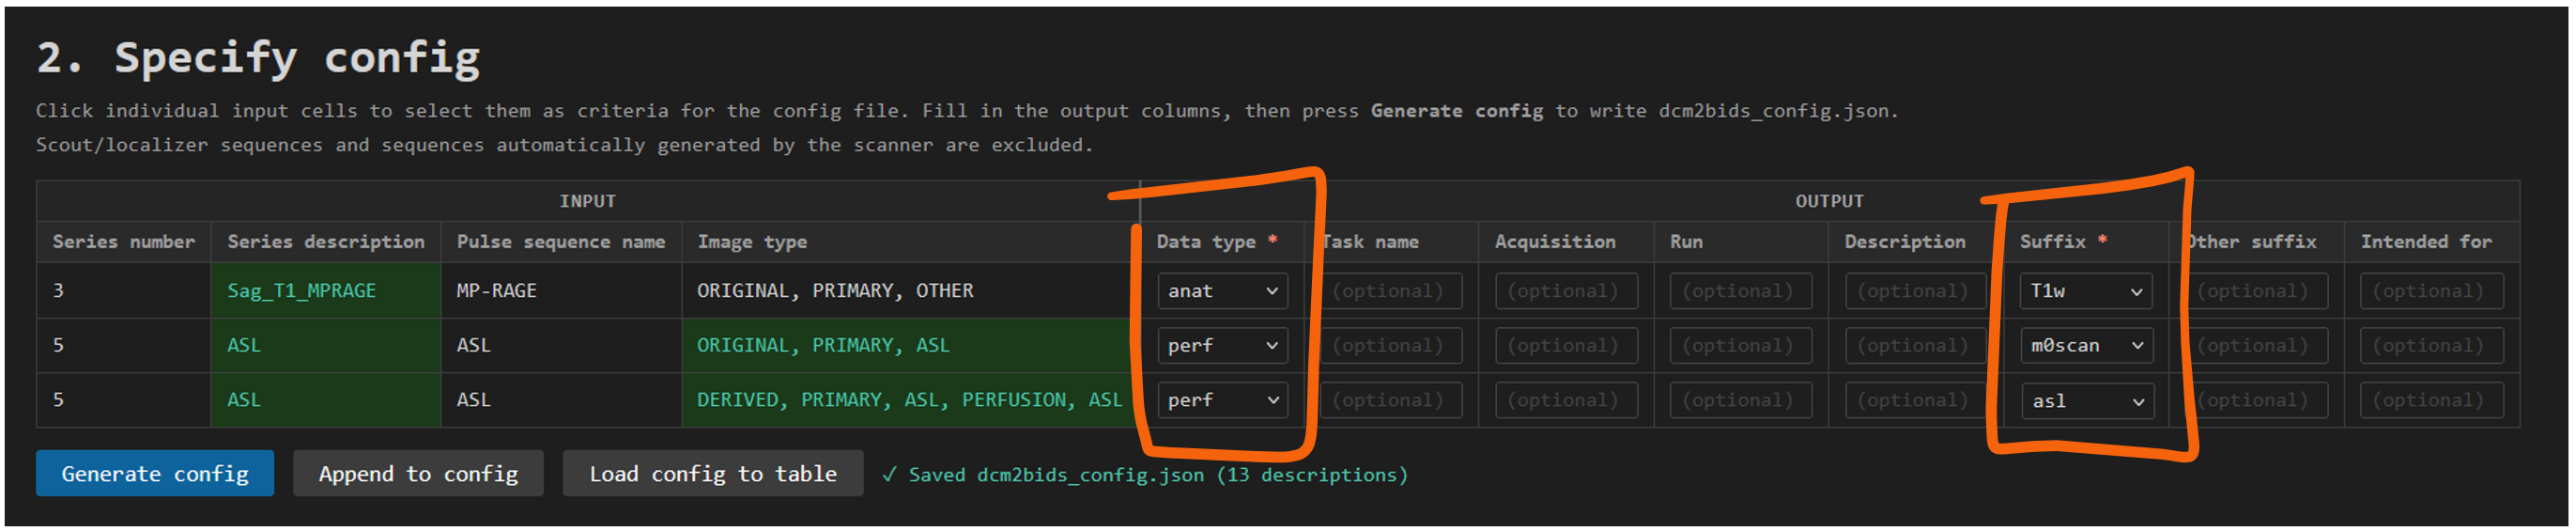
For the output section you MUST specify the datatype and suffix as indicated by an angry asterisk. For MR, datatype is either anat, func, perf, dwi or fmap. See the BIDS documentation for details on these. The suffix is more flexible but MUST match the datatype, generally the suffix specify the type of sequence used to collect the data, e.g. T1w or FLAIR for anatomical/structural data, bold for functional MRI data, and so on. The most common suffixes are available in a drop-down menu, but you can instead specify a specific suffix in free text under Other suffix.
In the image below, you can see we have specified datatype anat and suffix T1w for the T1 sequence, and datatype perf with suffix asl for the ASL sequence and m0scan for the m0 reference scan. This will result in the T1 sequence being saved as sub-XXX_ses-XX_T1w.nii.gz and the ASL sequence as sub-XXX_ses-XX_asl.nii.gz and sub-XXX_ses-XX_m0scan.nii.gz in the BIDS output.
The other output fields are optional but can be used to further specify unique output file names. For example, many fMRI protocols include a task that should then be specified. Consult the BIDS documentation for the use of different entities, in short:
- Task name
task: The name of the task performed during the scan, e.g.restfor resting state fMRI ornbackfor an n-back working memory task. - Acquisition
acq: The name of the acquisition protocol or equipment used. Useful for example if study is using more than one scanner model. - Run
run: The run number of the sequence. Useful if you have more than one run of the same sequence in your protocol, e.g. two runs of resting state fMRI. - Description
desc: Used to distinguish two files that do not otherwise have a distinguishing entity.
When you have specified a unique input as criteria, and a unique output for the resulting BIDS, for each sequence you want to include you click Generate config file to write your specifications to dcm2bids_config.json in cir-utils/tabs/mrbids in your project folder on SPICE. This is the config file that will be used as input for dcm2bids to organize your data as BIDS. This file will be loaded automatically next time you open this page, but you can also load it manually by clicking Load config file.
If you do not have a complete, representative session with all the sequences you want to include in your BIDS output, you can still use Append to config to append a new sequence input criteria and output structure to the config file while keeping the existing specifications.
You can also edit the config file manually if you want, in the tab Config Editor - but be careful to keep the JSON format.
A complete example
The image below show a complete example from a study including 13 different sequences, most included in the standard, recommended CIR protocol.
Columns not used here are cropped out of the image to make it easier to read.
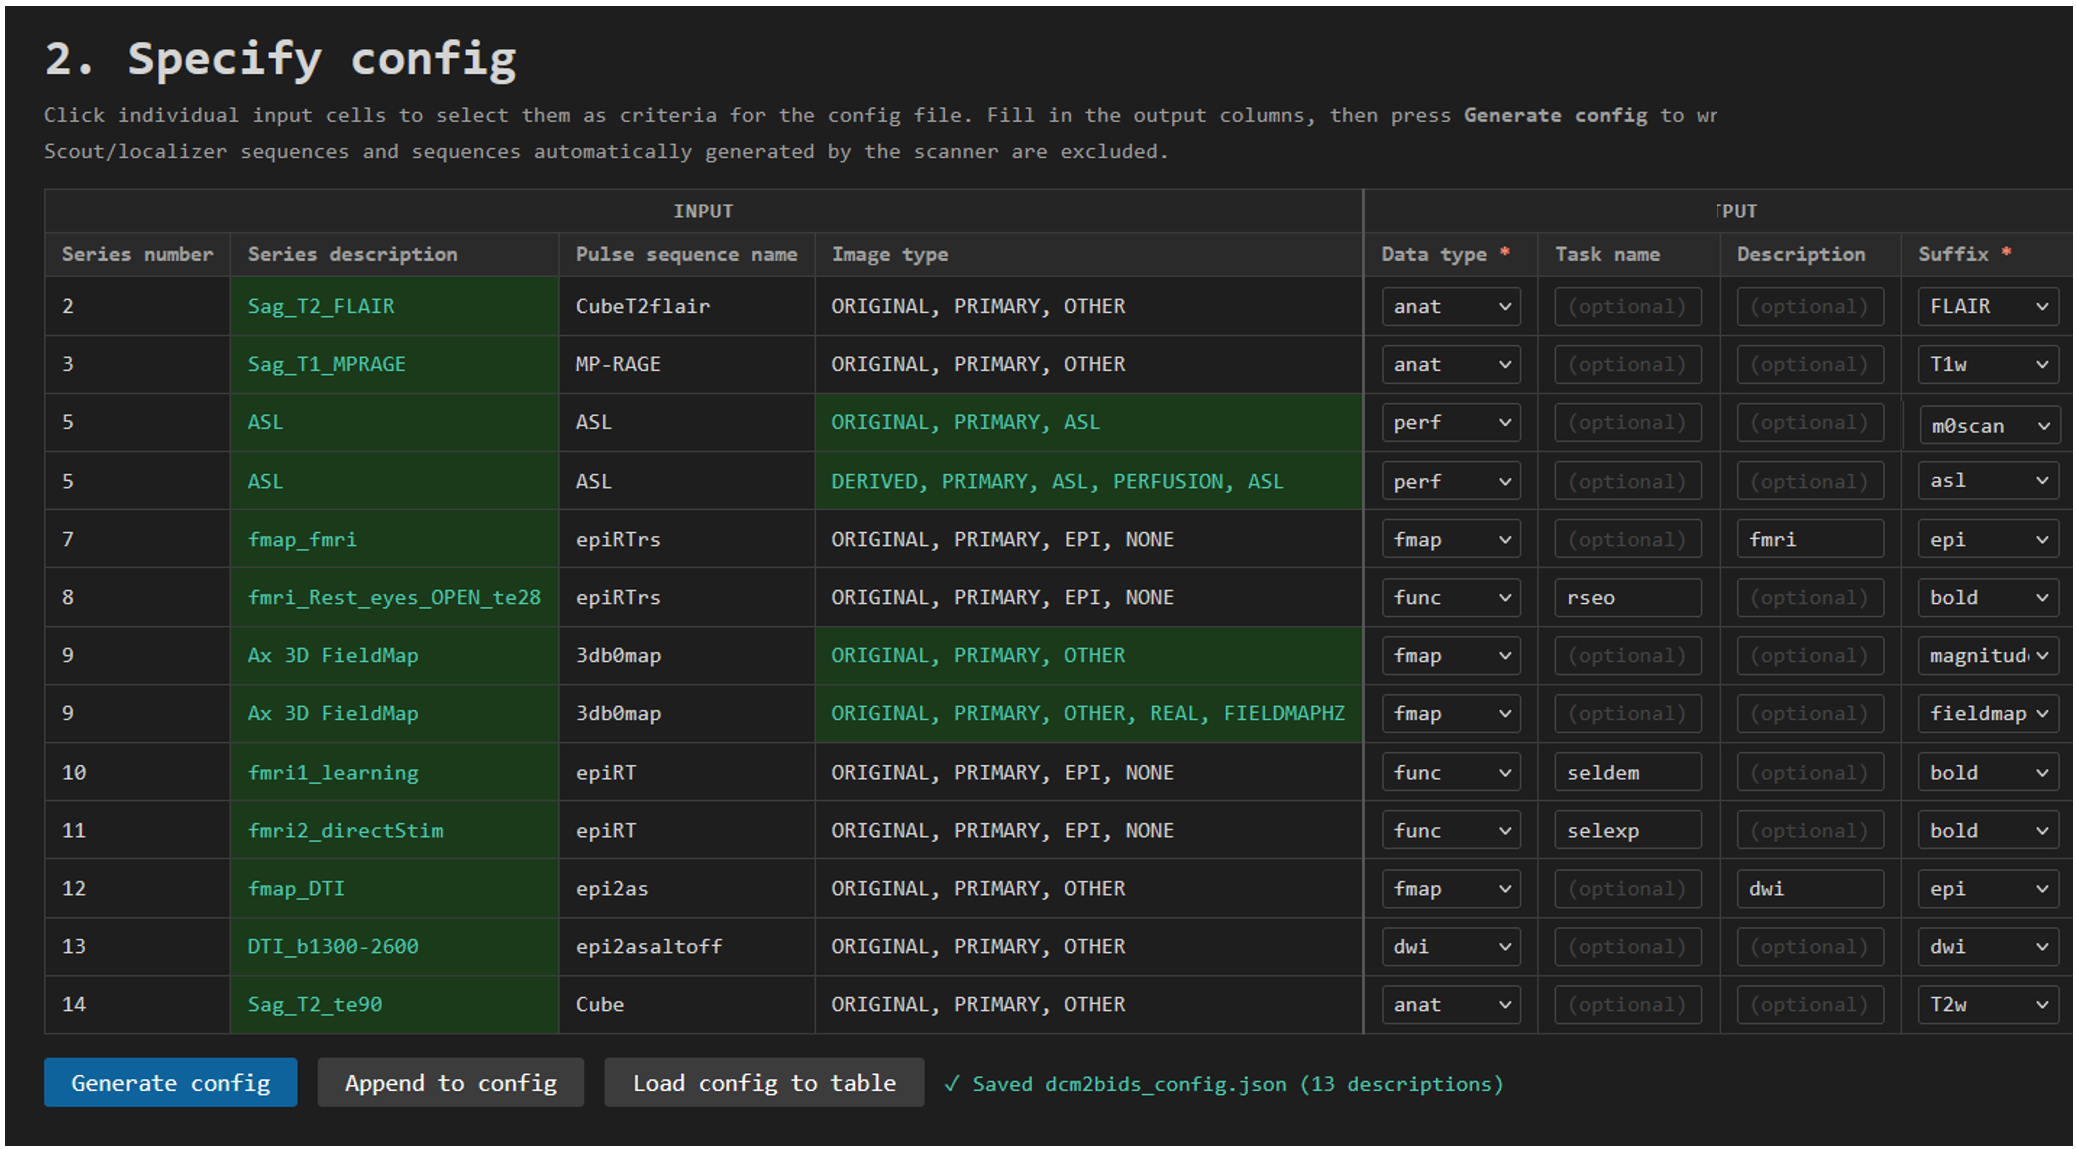
An example of a complete, and pretty busy, protocol. Scroll to the bottom of this page to see the output from running this config file.
Note that functional sequences, i.e. with data type func specify a task name to distinguish them from each other.
This protocol include 4 fmap sequences, intended to be used as reference either for fmri or dwi sequences. The desc column is used to distinguish two epi fieldmaps. Subsequently, these files will be named sub-012_ses-01_desc-dwi_epi.nii.gz and sub-012_ses-01_desc-fmri_epi.nii.gz in the BIDS output. Without the desc field these would both collide on the file name sub-012_ses-01_epi.nii.gz in this case.
5. Inspect your config file
You can view and make manual edits to your config file in the tab Config Editor. Be careful to keep the JSON format if you make manual edits here. It may be a good idea to keep a backup of your config file, both for book keeping and especially before making manual edits.
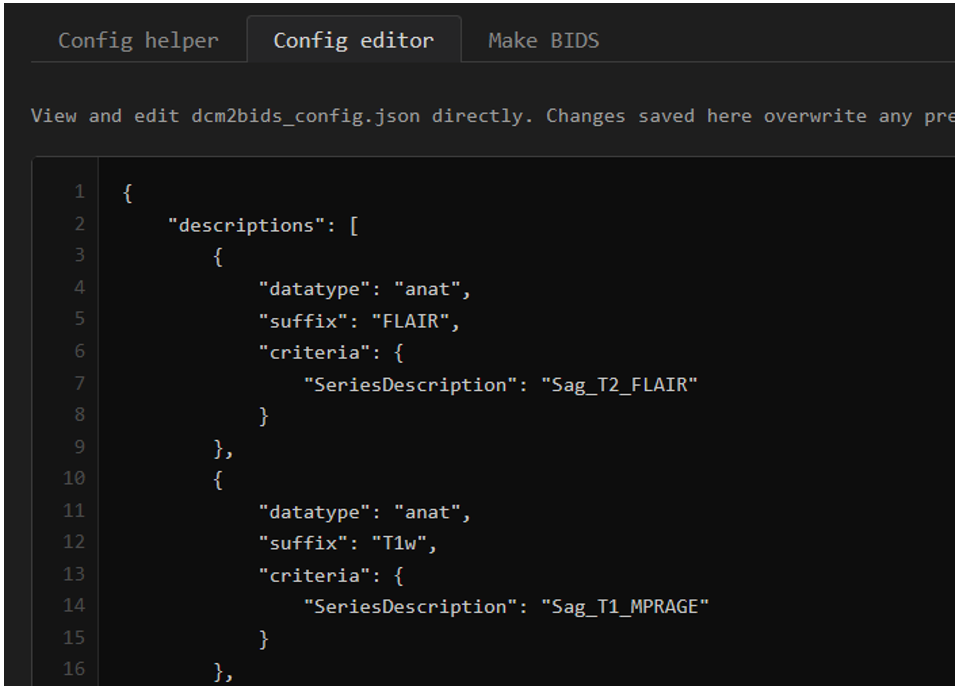
What the bare bones of the config file look like - a JSON file with a list of dictionaries.
6. Check subjects and sessions
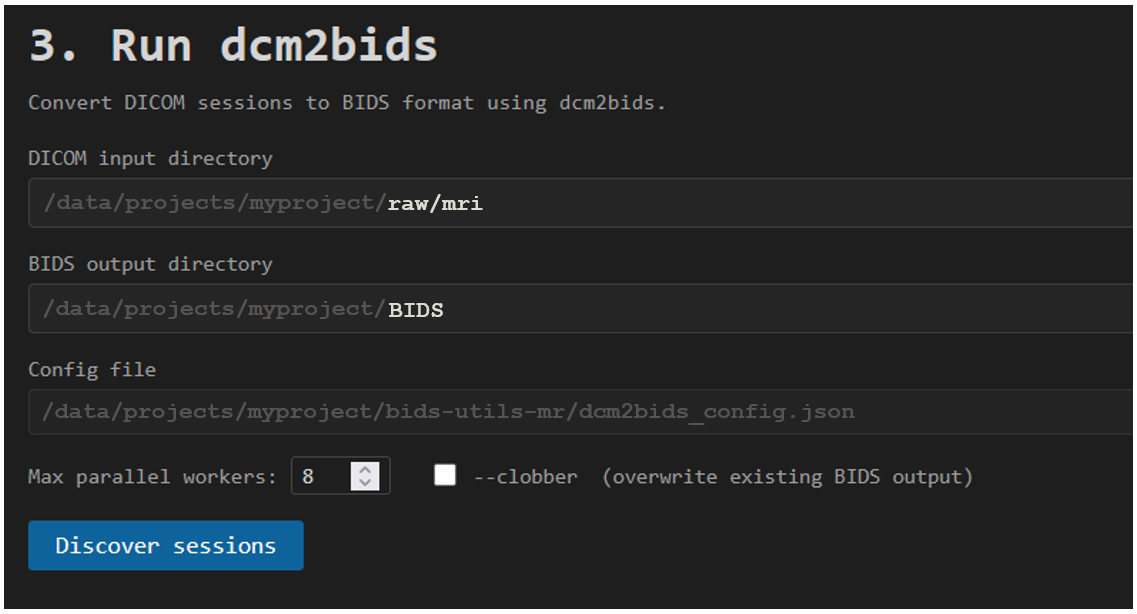
On the final tab Make BIDS you first check that paths you are using in your project folder are correct and then click Discover sessions to list all the sessions available for you to BIDSify.
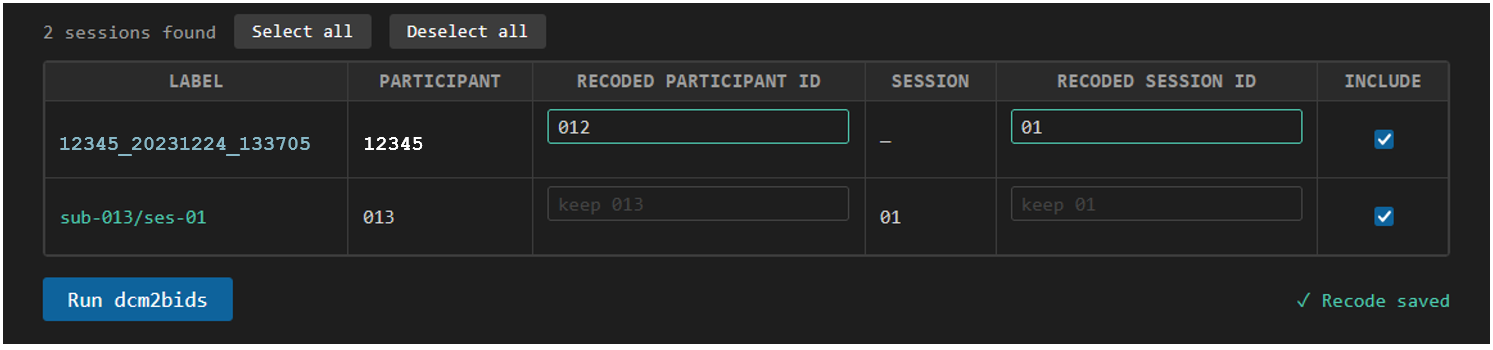
A table will show all subjects and sessions available in your raw data folder. You can specify which subjects and sessions to include in the BIDS output by checking the boxes in the table. Generally CIR will deliver your data in a pseduo-BIDS format but you can rename a subject and session if your raw data is not matching what you need for your BIDS output. Your recode-key will be saved as session_recode.csv in the bids-utils-mr folder on SPICE for you to keep track of how you have renamed your data.
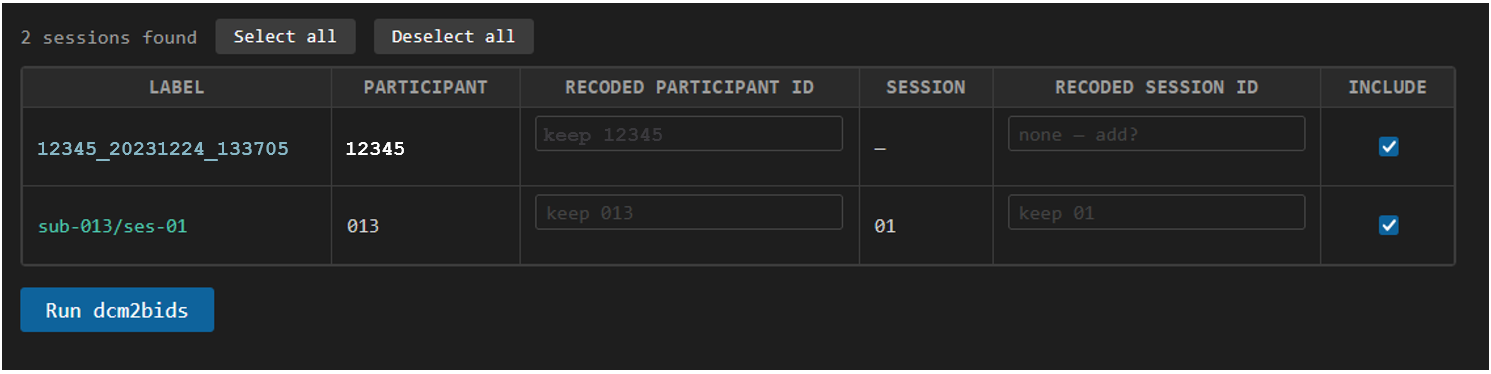
In the image above we see two sessions discovered, one subject is saved as an ID and date-time 12345_20231224_133705, a legacy format for MRI data at MRC. The participant ID is correctly extracted, but doesn't match our other subject and there is no session number.
We simply type in a new subject ID and session number in the table to recode this session to match the BIDS output we want. In this case, we recode the subject to sub-012 and session to ses-01. This is saved in the recode key so that next time we open this page, the same session is recoded to the same subject and session ID. Three digit subject IDs and two digit session numbers, both with leading zero-padding, are recommended.
7. Run dcm2bids
Finally, you click Run dcm2bids to start the processing. This will run dcm2bids in parallel on SPICE for all the sessions you have selected. You can select the number of parallell processes, up to 24, in the box for Max parallel workers.
Depending on how many sessions you have selected and how many sequences are in your protocol, this can take a while to complete. The output from dcm2bids is printed in the faux terminal window on the page so you can follow the progress and check for any errors.
This process is designed to be able to run regularly during your project. No need to wait until you have collected all your data to start organizing it as BIDS. Rather, start early to identify and correct any issues with your config file or mismatch naming in your protocol or raw data.
Your config file and recode key are saved in cir-utils in your project folder on SPICE and dcm2bids do not overwrite already existing BIDS files unless you tell it to (by checking the option to overwrite existing output).
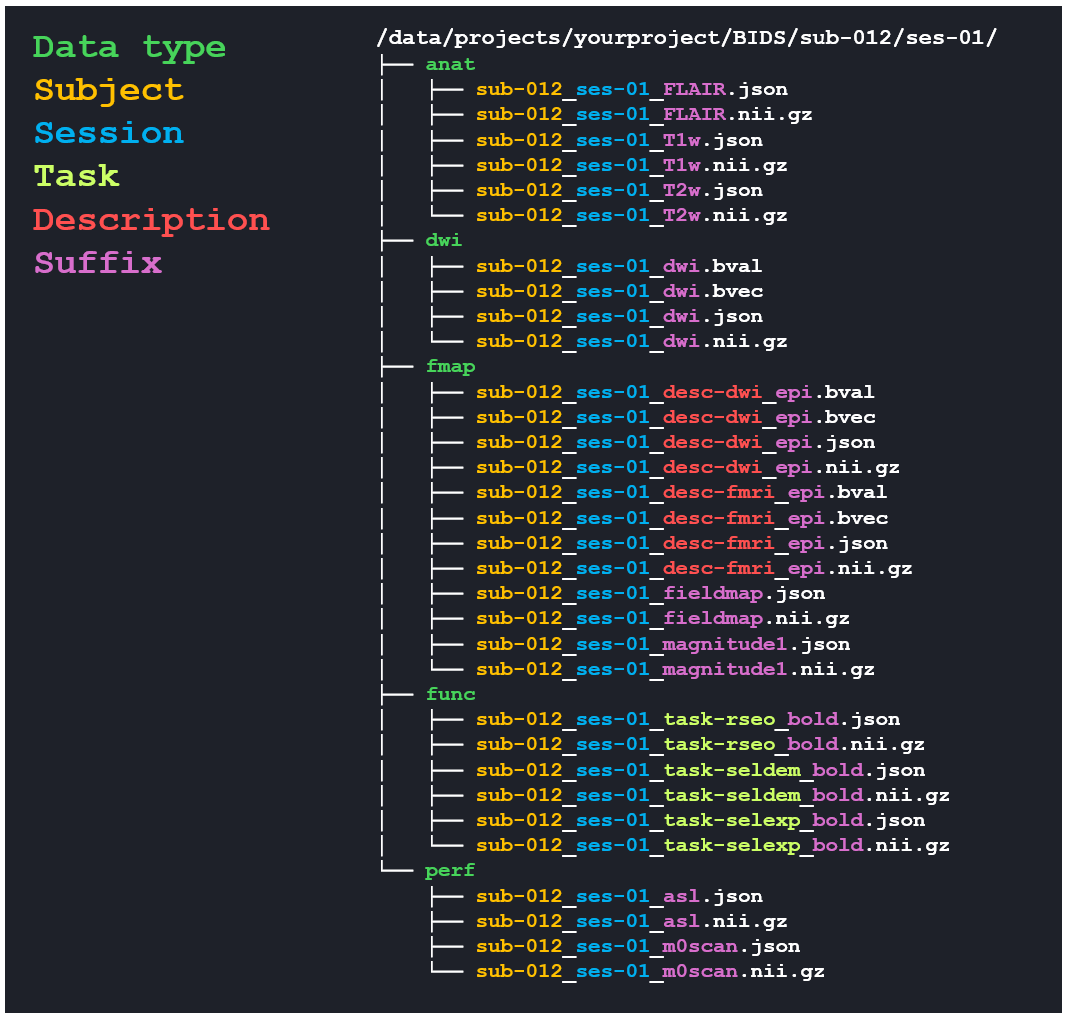
The output from the 13 sequences in the "complete example" config file from above, run on session recoded to sub-012 and ses-01. The output is printed in the faux terminal window on the page so you can follow the progress and check for any errors.
8. Celebrate
Congratulations!! 🎉 You have now organized your data as BIDS and can start using common pre-processing pipelines and tools for your data analysis. You are contributing to making your data more FAIR and reusable for other researchers, and you are saving time for yourself and others in the future by not having to re-invent the wheel for organizing your data for every new project. You can also share your config file with other researchers at CIR to further promote efficient data handling and sharing of best practices between projects.