Digitization
The digitization is the second part of the preparation. The first part is the placement of electrodes.
Co-registration of functional MEG/EEG data with structural MRIs for source reconstruction can be done either using a Fastrak digitizer from Polhemus or a Einscan H structured-light 3D-scanner from Shining 3D. The following process assumes using the Polhemus Fastrak. A process of the Einscan 3D-scan is not yet supported.
Why
With the OPM you will record the head position at the start and end of the recording. The MEG acquisition is done only with respect to the MEG device, instead of the anatomy of the subject. Therefore, MEG devices include a subsystem to determine the position of the head with respect to the MEG sensors. As MEG (unlike MRI) cannot directly measure the position of the head, small coils known as Head Position Indicator coils (HPI) placed at known locations on the scalp of the subject, when energized, will generate a magnetic field that helps us to localize the position of head in a three-dimensional space, with respect to the MEG sensor array.
Information about the patient's head position, orientation, and shape is obtained by digitizing (3D digitizer) the standard fiducial points, HPI coils, and the required additional points creating Cartesian co-ordinates in a 3D space. Digitization of four HPI coils, and landmarks, which include three bony fiducial points (Nasion, left, and right pre-auricular points), and additional points, is performed.
The HPI coil positions, and hence the head position, are estimated from the coil signals. After the recording, a OPM preprocessing script is used to transform and add the reference head position to the fif-file.
Before measurement
- Put an EEG-cap on the participant's head, it should fit tightly but not be uncomfortable.
- Tape on the HPI-coils on head on top of the cap. Make sure to find the positions where the cap will move as little as possible.
- Tape the tracker temporarily to the forehead.
- Start digitization software (instructions on the wall above the screen)
- Use the pen:
- Mark the landmarks in (LPA, Naison, RPA)
- Mark the HPI coils (double check by repeat measurement)
- Draw the pen across the head to create a head shape
- Mark eye brows and nose
- Save preparation
- Record a few seconds of data on the Acquisition system to store the digitization data into a fif-file (preferably headshape.fif)
Warning
Do not start the recording on Acquisition while you record OPM data as starting an Acquisition recording will cause an artifact in the OPM data.
During measurement
Record HPIbefore
After measurement
Record HPIbefore
Issues
I forgot to record the headshape data
I forgot to record a few seconds of data on the Acquisition computer for digitziation.
You can retrieve the data up 24 hours after the recording by selecting the proper project, settings, subject and load correct preparation.
Acquisition does not ask about measuring HPI
Acquisition will automatically ask if you want to do/redo HPI fit every time you click START or RESTART. If you pressed Skip but want to do the HPI fit anyway, you need to restart the recording.
If Acquisition does not ask about measuring HPI, it might be because it has not registered the HPI digitization. You can check if HPI is digitized in the Acquisition main window. It will either specify the time the HPI was digitized or say "HPI: not digitized!"
Load the correct preparation with the digitized HPI coil locations
Every time you click start in Acquisition, it saves a new preparation, so make sure that you note the time you saved the preparation with the digitized HPI on the digitization PC.
HPI errors
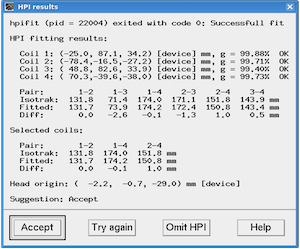
(HPI results window showing successful HPI fit)
Errors with HPI. It gives an error message or Suggestion in HPI results window (screenshot) is "redo HPI" as opposed to "Accept" (like in the screenshot).
- Make sure the correct preparation is loaded with the digitized HPI coil locations.
- Check that the HPI cable is connected to the panel at the side of the scanner.
- Click "Try again" to see if the fit has improved.
- Make sure that all HPI coils on the participant's head is inside the helmet. If possible, reposition the participant, so at least three HPI coils are inside the helmet. Click "Try again" to see if the fit has improved. If not, proceed to step six.
- Check for loose coils that might have come off. Do not try to re-attach them; go to step six.
- Redo HPI/isotrak fit: Get the participant out of the scanner to the preparation area. Then reposition/re-attach HPI coils and redo the digitization.